Maintenance
MAINTENANCE INSTRUCTIONS
INITIAL CHECKS
- Is everything plugged in?
- Is the by-pass valve closed?
- Is your flow rate at least 10 gpm?
- Are the electrode chambers clean?
- Are the clocks set to the correct time?
- Do the red dots on the control box rotate when water is flowing?
BACKWASH VALVE SETTINGS
- TIME: To set the time, press the left reset button, then press and hold either arrow button until the letters “TD” (Time of Day) appear. Move the arrow buttons to set the time to the current time. Remember, any time the power goes out, these clocks will need to be re-set.
- CHANGING THE TIME OF BACKWASH: These timers are pre-set. The second tank is usually set for 2:00 am and the third tank for 3:00 am, so they don’t backwash at the same time. If you have an arsenic tank, it will be pre-set for 4:00 am.
To change the day of backwashing, hold down both arrow buttons simultaneously until “DO” (Day Override, or Daily Operation) appears. The number signifies how many days will pass between backwashes. With the arrow buttons, change the frequency to your preferred settings. For example, with high iron levels the birm tank might need to backwash every one or two days, but with lighter levels, once every three days is sufficient.
To change the time of backwash, press the reset button again, and “RT” (Regeneration Time) will appear. With the arrow buttons, change the time to your preferred settings. - RUNNING A MANUAL BACKWASH: To run a backwash cycle manually, press and hold the left re-set button until the letters “BW” (Back Wash) appear. Release the button and let the cycle run.
- SETTING BACKWASH FREQUENCY
The backwash clock comes factory-set to run a backwash cycle once every three days for the second tank and once every seven days for the third tank. If your water has high levels of iron or manganese, daily backwashing will produce better results. For example, with heavy iron in the water, backwash the hydroxite tank every day, and the carbon tank every other day.
To change the number of days between cycles, press both the down and the up arrows simultaneously, and hold them down until the letters “DO” (Day Override) show on the screen. Press the arrow buttons to adjust the frequency. Then push the reset button on the left to save your new setting.
MAINTENANCE OVERVIEW
MAINTENANCE OVERVIEW
TITANIUM ELECTRODE CHAMBER
The titanium electrode chamber contains two electrically-charged titanium plates that are key to the system’s operation. They create pure oxygen, and are more powerful than ozone.
Oxidizing dissolved minerals causes them to flocculate: they are converted to larger clumps and particles that can then be filtered out.
- For example, ferrous iron becomes ferric iron, which is like rust.
- Sulfur gas becomes a solid that can then be filtered, removing any odor.
- Arsenic 3 becomes Arsenic 5, which can then be removed.
- Calcium carbonate becomes calcium bicarbonate, so the pipes will not scale.
- Heavy oxygen exposure can also kill some bacteria.
Because these metal plates are electrically charged, electrolysis occurs, causing them to corrode over time. The voltage between the plates should be in a range of 7-19 volts DC. The cleaner the plates are, the more effectively electrodes can pass between the two plates. The heavier the corrosion build-up, the weaker the electrical current becomes, until eventually they do not work at all. To prevent this, the plates are installed in a transparent chamber so they can be monitored quickly visually. Print out the cleaning instructions and post them near the system for quick reference.
RETENTION TANK
The first tank is empty. Its purpose is to provide more contact time with the oxygen and to allow the particles to settle to the bottom. Once a year, attach a hose to the bottom drain and flush the tank for a few minutes. You will see a small burst of solids exit and you are done.
BIRM TANK
Birm is one of several types of media that can be used to remove dissolved minerals and heavy metals. Birm works particularly well for removing oxidized iron and manganese. Because heavy metals and minerals weigh more than other contaminants, this media must also be heavier, so it requires more water flow to be able to blow out the dirt during the backwash cycle. To reverse the flow and blow everything up from the bottom and out the drain tube at the top, between 10-15 GPM is required. Mark where the media is at rest, then start a backwash and measure how many inches the media rises; for proper operation, it must rise at least six inches. To watch this process, turn off the lights in the room and shine a flashlight through the back of the tank. Read the section on flow rate to check what you have.
Because this tank takes the brunt of the filtration process, the media will foul within three to five years, at which point it should be dumped our and be replaced with fresh gravel and media. Read the instructions on how to re-bed the tank in the “Maintenance” section.
CARBON
Granular activated carbon is famous for removing chemicals, pharmaceuticals, color, flavor, and odor. Carbon is so absorptive that it is frequently used to remove chlorine. Because this is the second filter tank, it will last much longer, and should be re-bedded every eight to ten years.
COPPER ELECTRODES
Now that the particles, minerals, metals, chemicals, and odors have been removed, the only thing left is bacteria. This chamber contains two electrically charged copper plates that produce just enough electrically-charge copper to be able to kill the bacteria residually in all the pipes throughout the house. The amount of copper created is less than the amount in a single vitamin, but it is sufficient to prevent bacteria build-up on the pipe interiors and to maintain clean, drinkable water all the way to the point of use.
With this chamber as well, it is important to watch for corrosion build-up. A little bit is fine, but if the insides of the plates become completely coated, the electrical current will be impeded. Excessive corrosion build-up on the copper plates may affect the flavor of the water. Because copper is a soft metal, inspect and clean them possibly monthly. Because titanium is a hard metal, it may take several months for them to corrode, in which case they may not need to be cleaned as frequently as the copper. However, sometimes it is easier to clean both chambers each time.
If you wish to print and post this overview, click on this link: Maintenance Overview
CLEANING THE ELECTRODE CHAMBERS
TOOL KIT
- Two five-gallon buckets, preferably of two different colors. Use a white bucket for the diluted muriatic acid to get a clear view of the bubbles and the particles as they fall out of the chamber. Use a colored bucket for plain water so the buckets are not confused.
- A pair of acid-resistant rubber gloves.
- A gallon of muriatic acid, available at most hardware stores. Stock up and buy two or three gallons for future use.
- A large bag of baking soda and a cup or scooper for neutralizing the acid after use.
- Two wrenches for loosening and tightening the union rings on the chambers. Purchase a pair of the following: two large channel lock pliers, or two strap wrenches, or two curved channel locks used for changing car oil filters. My preference is FloTool 10627GT GRIPTECH Filter Pliers because they are light-weight and rubber-coated for a firm grip that does not scratch.
REASON
Because these metal plates are electrically charged, electrolysis causes them to corrode over time.
The cleaner the electrodes are, the better they will work.
Visually inspect the chambers routinely, and plan on cleaning them the first of each month.
DIRECTIONS
- Before starting, gather your tools: acid-resistant rubber gloves, two 5-gallon buckets, one gallon of muriatic acid, two filter wrenches*, baking soda, and possibly goggles. It helps to have one white bucket and one bucket of another color, or to label two similar buckets, in order to keep track of which bucket contains water and which contains acid.
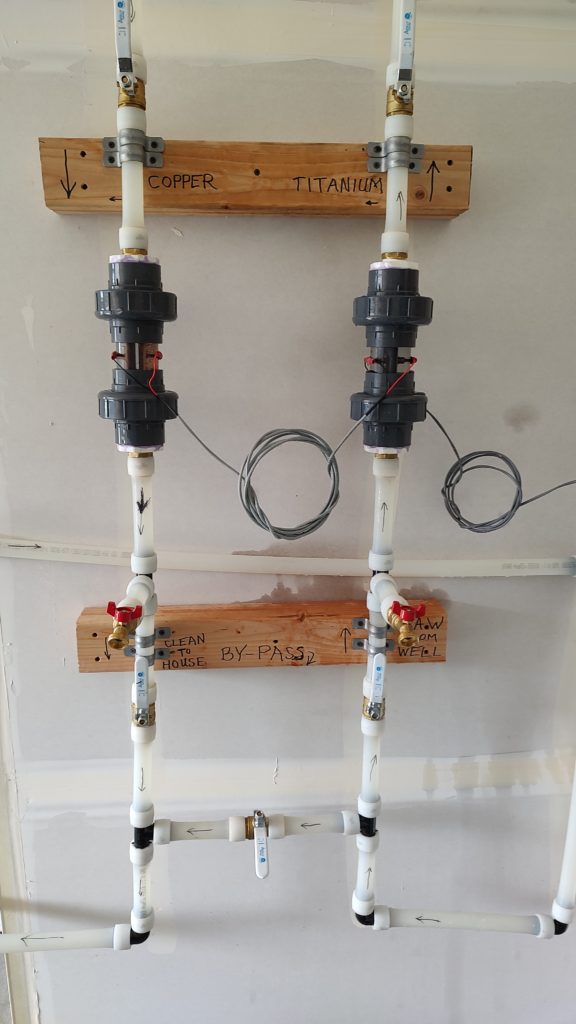
- If they are not already labeled, with a marker pen write on the wood or wall next to each chamber which chamber is titanium and which is copper. The titanium is always the first one in the direction of flow.
- Half-fill the colored five-gallon bucket with water to be used for rinsing the chambers at the end.
- Wear gloves. To be precise, fill the white bucket with one part of muriatic acid to five parts of water. The bucket should be full enough so that the chambers will be fully submerged when water is added. To be approximate, pour a quarter to a third of the gallon of acid into the bucket and then add about two to five times as much water. The recommended proportion is 1:5, although 1:3 works a little faster.
- Isolate the chambers by turning off the valves located immediately before and after each chamber.
- Drain the chambers. Place the water bucket beneath the hose bibs. Open the hose bibs and hardly any water will come out. However, when you loosen the upper union rings on the chambers, air will enter the system which will allow a lot of water to flow out into the bucket.
- Take note how the wires were connected to the electrode chambers. Unplug these electrode wires by carefully pulling them off the tabs located on the outside of the chambers. Although this can be done with your fingers, a pair of dedicated needle-nose pliers makes removal easy.
- If the unions on each chamber are too tight to loosen by hand, to break the seal use large channel lock pliers, strap wrenches, or oil filter curved channel locks. As soon as the first union is loosened, the air that enters will release a little more water out of the drain, so have the bucket ready.
- Remove the unions by hand, carefully sliding them straight out from their normal locations.
- Pay attention to the large brown rubber O-rings on the union. Sometimes the upper one will fall out when the chamber is being removed. If it does, set the O-ring aside on a clean place where you will remember, such as on top of the wood, or hook it on the valve handle.
- Wearing rubber gloves, gently set the two chambers into the bucket of diluted acid. Make sure they are submerged. Watch them bubble.
- Look at the clock to time the process. After 10-12 minutes, the bubbles should slow down and stop. The plates should be clean.
- With gloves, remove the chambers and visually examine them. They should look clean and new. If there is still corrosion, let them soak a bit longer.
- When you are satisfied that the plates are clean, rinse the chambers in the bucket of water.
- Replace the chambers where they belong. When putting them back, check that the rubber “O” rings are inside the indentations in the unions. If the upper one was removed, seat it back in place before sliding the chamber in.
- Although it doesn’t matter which direction the chambers face on the pipes, make sure the titanium goes at the beginning and the copper goes at the end. Replace them where they came from. Once installed, rotate each chamber so that the plates are easy to look through for future inspection.
- Hand-tighten the unions. Often this is sufficient. For extra security, snug them slightly more with the wrenches.
- Reconnect the wires. Press and wiggle them on until they are fully seated. An easy way to remember where the wires go is to put the red wires on the right side of each chamber: “red” on “right” both start with “R.” The remaining black wires go on the only tabs left, and the second letter in “black” is “L” for “left.” Just think “red on right” and the rest will be obvious. The goal is to have one positive plate and one negative plate. Put red together with red on one side, and black together with black on the opposite side. To understand the order of the wires, follow them from the source: the impeller on the outlet behind the Birm tank backwash clock spins when water is flowing. A wire goes from the impeller to the white control box. From the white box, another wire goes to the titanium electrode chamber. A third wire connects the titanium chamber to the copper chamber.
- Turn on the inflowing valves to check for leaks. If the union leaks, tighten it a little more. If it still leaks, remove the ring and check if the O-ring is correctly seated or if it is kinked or crooked. If it still leaks after reassembling, lubricate the rubber O-ring with some teflon or silicon lubricant.
- Now turn on both valves and your water is back in use. Congratulations!
- Dispose of the acid. While it might seem economical to save the bucket of acid for the next cleaning a month or more later, it does look very much like a bucket of water and could be accidentally used or spilled by someone else who is unaware of potential hazard. Although you could simply dilute the bucket with even more water and dump the acid on the driveway, the road, or somewhere that would not harm plants, it is safest to neutralize it with baking soda. Start with a single scoop and watch it foam up. As the foam goes down, adding consecutively more scoops will gradually diminish the reaction until the foam is either significantly reduced or totally stopped. The end result is salt, water, and carbon dioxide gas. Now it is safe to dump the acid water wherever you don’t mind putting salt.
- Rinse off your buckets and gloves. Create a dedicated and convenient location to keep these tools ready for the next cleaning. Some people hang their wrenches on the wall, others keep everything in the buckets.
- Keep a log. Hang a clip board or a spiral notebook somewhere near your system and keep track of the date you serviced your system. Record what you just did, including any comments.
- Whenever water is running, the red lights on the control box should rotate. They alternate directions of rotation between clockwise and counterclockwise as the electrical polarity changes back and forth from positive to negative every 1-1.5 minutes. If the dots do not rotate when water is being used, please contact us for assistance at (206) 324-5055.
* Strap wrenches or large channel locks work, but the lightest weight and easiest to handle tool would be a set of curved filter pliers designed for removing oil filters from cars. My preference is FloTool 10627GT GRIPTECH Filter Pliers because they are light-weight and rubber-coated for a firm grip that does not scratch.
Print out these instructions and post them by your electrode chambers:
Instructions for Cleaning the Electrode Chambers

RE-BEDDING MEDIA TANKS
Over time, the media in the filter tanks will foul, break down and become ineffective, and must be replaced. The Birm/Hydroxite media in the second tank will last 3-5 years. The Granular Activated Carbon in the third tank will last 8-10 years. Re-bedding a filter tank can take about and hour, and should be done by a professional. If you are inclined to do this yourself, here is the procedure.
- Turn off the water to and from the filters.
- Open the hose bibs in the filter section and release the pressure. Another option is to turn the by-pass valves on the tank.
- Unplug the timer, remove the drain fitting, and place the tank on a hand truck.
- Move the tank outside to a place suitable for emptying the contents. Run a hose over to the location.
- Unscrew the timer valve and remove it from the tank.
- Tip the tank gently onto its side and insert a running hose inside the tank to flush out the old media and gravel.
- Remove the basket and riser, rinse out the tank interior, and clean the tank.
- Make a new basket and riser to match the original.
- Tape the end of the riser so nothing can enter it.
- Set the tank back up. Center the taped basket and riser in the tank.
- Place a funnel on top of the tank and add 22-25 lb. of gravel.
- Add one cubic foot of new media (1.5 cu. ft. maximum for a 10×54 tank).
- Blow or rinse off the mouth of the tank and remove the tape from the riser.
- Move the tank back into position with the treatment system.
- Fill the tank with water to allow time for the media to absorb and expand and to reduce the dust.
- Carefully thread the timer valve back on top of the tank, reconnect the by-pass and drain fitting, and plug in the power.
- Run a complete backwash cycle.

TROUBLESHOOTING
If something is not right, go through this basic checklist.
If you still can’t figure it out, call Dean at (206) 324-5055.
- Is everything plugged in? Check the wires from the white control box and the black backwash valves.
- Is the by-pass valve turned off and the valves to and from the filter turned on?
- Do the red dots on the white box rotate when water is in use? Do they change direction of rotation every minute or so?
- Is your clock set to the correct time?
- Visually inspect the electrode chambers. Are the wires snug on the tabs? Are the plates clean or corroded?
- Run a backwash to find out if the drain tubes are clear or clogged.
- Do you have 10-12 gpm of flow going into your system?
- How frequently is each tank being backwashed? Should the tanks backwash more often?
FREEZE PROTECTION
It is important to protect the electrodes from freezing and cracking. They are expensive to replace and easy to preserve if you know a freeze is imminent.
- Before the pipes freeze, turn off the valves before and after each electrode chamber.
- Place a bucket beneath the hose bib beneath each chamber and open the drain valves.
- Loosen the top union ring on each chamber to release the air so that all the water in each chamber can drain into the bucket.
Once the weather warms and the threat of freezing has passed, tighten the top union ring on each chamber, close the hose bibs, and open the valves.